Flutter Marketplace app with Stripe Connect - Part 2
- Authors
- Name
- Muhammad Ahsan Ayaz
- @codewith_ahsan


- Posted on
- Posted on
In Part 1 of the series, we learnt about how to configure Payments using Stripe Connect for the marketplace app Panda Gums built with Flutter. And we implemented the initial steps of the Seller Onboarding flow. In this article, you'll learn how to implement Deep Links into the Panda Gums app. You'll also learn how we'll use Stripe Checkout to pay for products as customers in the Flutter app. The code repositories for this tutorial are as follows:
Getting Started
Note: If you haven't followed Part 1 of this series, please follow it before proceeding. I.e. make sure you have the Flutter app and the Backend code checked out and ready
For this part, checkout the part-2 branch by running the following command
from the flutter application root:
git checkout part-2
Then run the local backend server by navigating to the server project, and running the following command:
yarn dev
## OR
npm run dev
Now run the Flutter application in an Android emulator. Once done, make sure
we're exposing the port 3000 to the device by running the following command in
terminal:
adb reverse tcp:3000 tcp:3000
Implementing Deep Links in the Flutter app
To be able to get back in the app from the Seller Onboarding Flow, we need to
implement Deep Links in the Flutter app. You can read more about them in the
Flutter Deep Linking
docs. To keep this tutorial short, we're going to implement a Custom URL
Scheme for our Flutter app. This scheme is pandagums:// and we use it when
clicking the Continue to App button on the
Connect Onboarding redirect page.
As shown in
Figure 1.12.
To enable deep links in the Flutter app, open the file
android/app/src/main/AndroidManifest.xml and update it as follows:
<manifest xmlns:android="http://schemas.android.com/apk/res/android"
    package="com.example.flutter_stripe_connect">
    <queries>
        ...
    </queries>
   <application
        android:label="flutter_stripe_connect"
        android:usesCleartextTraffic="true"
        android:icon="@mipmap/ic_launcher">
        <activity
            android:name=".MainActivity"
            android:launchMode="singleTop"
            android:theme="@style/LaunchTheme"
            android:configChanges="orientation|keyboardHidden|keyboard|screenSize|smallestScreenSize|locale|layoutDirection|fontScale|screenLayout|density|uiMode"
            android:hardwareAccelerated="true"
            android:windowSoftInputMode="adjustResize">
            ...
            <intent-filter>
                <action android:name="android.intent.action.MAIN"/>
                <category android:name="android.intent.category.LAUNCHER"/>
            </intent-filter>
            <meta-data android:name="flutter_deeplinking_enabled" android:value="true" />
            <intent-filter>
                <action android:name="android.intent.action.VIEW" />
                <category android:name="android.intent.category.DEFAULT" />
                <category android:name="android.intent.category.BROWSABLE" />
                <data android:scheme="pandagums" />
            </intent-filter>
        </activity>
        ...
    </application>
</manifest>
Note: After the above change, the app needs a full restart. Restart the app before proceeding with further steps.
Once you have run the application, test the Deep Link. Open the browser (Chrome) in the emulator, then navigate to http://localhost:3000/register-mobile?result=success and tap the Continue in App button as shown in Figure 2.1

Wohoo 🎉 ! We just got the Deep links working in a single step. However, we just did a test run. We still don't have a complete Seller Onboarding flow that the user can follow seamlessly.
Implementing the Registration Success page in the App
When the Seller has successfully completed the onboarding, we will deep link
into a new page within the Flutter app. Let's call it the Register Success
Page. We'll need to create this page first. Let's create a new file inside the
lib/pages folder named register-success.dart and add all of the the
following code in it:
import 'package:flutter/material.dart';
import 'package:flutter_stripe_connect/app-state.dart';
import 'package:flutter_stripe_connect/router/pages_config.dart';
import 'package:provider/provider.dart';

class RegisterSuccessPage extends StatefulWidget {
  @override
  _RegisterSellerState createState() => _RegisterSellerState();
}

class _RegisterSellerState extends State<RegisterSuccessPage> {

  @override
  void initState() {
    super.initState();
  }

  @override
  Widget build(BuildContext context) {
    PageConfiguration routeArgs = ModalRoute.of(context)!.settings.arguments as PageConfiguration;
    Map<String, dynamic> extras = routeArgs.extras as Map<String, dynamic>;
    final appState = Provider.of<AppState>(context, listen: false);
    Future.delayed(Duration(seconds: 1), () {
      appState.accountId = extras['account_id'];
    });
    return Scaffold(
      appBar: AppBar(
        title: Text("Register as Seller"),
      ),
      body: Center(
        child: Text('Registration Successful'),
      ),
    );
  }
}
Notice the following lines in the code we just added:
...
class _RegisterSellerState extends State<RegisterSuccessPage> {
  ...
  @override
  Widget build(BuildContext context) {
    PageConfiguration routeArgs = ModalRoute.of(context)!.settings.arguments as PageConfiguration;
    Map<String, dynamic> extras = routeArgs.extras as Map<String, dynamic>;
    final appState = Provider.of<AppState>(context, listen: false);
    Future.delayed(Duration(seconds: 1), () {
      appState.accountId = extras['account_id'];
    });
    return Scaffold(...);
  }
}
The page assumes that we'll receive some route arguments when this page is
pushed into the routes stack. The specific argument we're interested in is
account_id. We extract the route arguments using
ModalRoute.of(context)!.settings.arguments, then we use routeArgs.extras to
extract our custom extras parameter (more on this later) in the
next section.
And then we take out the value of the account_id property and assign it to the
appState.accountId property. Saving this in the App State is essential because
we use this accountId property in the customer page when paying for the
products. Essentially, this saved accountId is the Seller's Connected
Account ID. When we tap the Continue in App button in the Browser from the
http://localhost:3000/register-mobile
page, it deeplinks into the Register Success page, passing the account_id
along with the deep link.
And you can support these efforts by becoming a supporter at 'Buy me a coffee' ☕
Configuring the Deep Link for the Registration Success page
Installing the uni_links package
The first thing we need to do is to install the uni_links package. Follow their official documentation for installing it.
Once the package is installed, make sure to restart the flutter application.
Then open the file lib/main.dart and add the following code to listen to the
deep links:
import 'dart:async';
...
import 'package:provider/provider.dart';
import 'package:uni_links/uni_links.dart';
...
class _MyAppState extends State<MyApp> {
  final appState = AppState();
  late AppRouterDelegate delegate;
  final parser = AppRouteParser();
  late AppBackButtonDispatcher backButtonDispatcher;

  late StreamSubscription _linkSubscription;

  _MyAppState() {...}

  @override
  void initState() {
    super.initState();
    initPlatformState();
  }

  @override
  void dispose() {
    _linkSubscription.cancel();
    super.dispose();
  }

  // Platform messages are asynchronous, so we initialize in an async method.
  Future<void> initPlatformState() async {
    // Attach a listener to the Uri links stream
    _linkSubscription = uriLinkStream.listen((Uri? uri) {
      if (!mounted) return;
      setState(() {
        delegate.parseRoute(uri!);
      });
    }, onError: (Object err) {
      print('Got error $err');
    });
  }

  @override
  Widget build(BuildContext context) {
    return ChangeNotifierProvider<AppState>(...);
  }
}
Now that we are listening to the deep links, let's configure our deep link route in the next section
Configuring the deep link route
There are a few pieces we have to add here since we're using
Flutter's new navigation & routing system
in this app. First, we need to add a configuration for this page. To do so, open
the file lib/router/pages_config.dart and add some code as follows:
import '../app-state.dart';

const String RegisterPath = '/register';
const String PayOutPath = '/pay-out';
const String HomePath = '/home';
const String RegisterSuccessPath = '/register-success';

enum Pages { Register, PayOut, Home, RegisterSuccess, PayOutSuccess }

class PageConfiguration {...}

PageConfiguration registerPageConfig = PageConfiguration(
    key: 'Register',
    path: RegisterPath,
    uiPage: Pages.Register,
    currentPageAction: null);
PageConfiguration payOutPageConfig = PageConfiguration(
    key: 'PayOut',
    path: PayOutPath,
    uiPage: Pages.PayOut,
    currentPageAction: null);
PageConfiguration homePageConfig = PageConfiguration(
  key: 'Home', path: HomePath, uiPage: Pages.Home, currentPageAction: null
);
PageConfiguration registerSuccessPageConfig = PageConfiguration(
  key: 'RegisterSuccess', path: RegisterSuccessPath,
  uiPage: Pages.RegisterSuccess,currentPageAction: null
);
Now open the file lib/router/routes_parser.dart and add the code as follows:
...
class AppRouteParser extends RouteInformationParser<PageConfiguration> {
  @override
  Future<PageConfiguration> parseRouteInformation(RouteInformation routeInformation) async {
    ...
    switch (path) {
      case RegisterPath:
        return registerPageConfig;
      case PayOutPath:
        return payOutPageConfig;
      case RegisterSuccessPath:
        return registerSuccessPageConfig;
      default:
        return homePageConfig;
    }
  }

  @override
  RouteInformation restoreRouteInformation(PageConfiguration configuration) {
    switch (configuration.uiPage) {
      case Pages.Register:
        return const RouteInformation(location: RegisterPath);
      case Pages.PayOut:
        return const RouteInformation(location: PayOutPath);
      case Pages.Home:
        return const RouteInformation(location: HomePath);
      case Pages.RegisterSuccess:
        return const RouteInformation(location: RegisterSuccessPath);
      default: return const RouteInformation(location: HomePath);
    }
  }
}
Once done, open the file lib/router/router_delegate.dart and update the
parseRoute method as follows:
import 'package:flutter/foundation.dart';
...
import 'package:flutter_stripe_connect/pages/register-success.dart';
...
class AppRouterDelegate extends RouterDelegate<PageConfiguration>
  with ChangeNotifier, PopNavigatorRouterDelegateMixin<PageConfiguration> {
  ...
  void parseRoute(Uri uri) {
    ...
    if (uri.pathSegments.length == 1) {
      final path = uri.pathSegments[0];
      switch (path) {
        ...
        case 'pay-out':
          push(payOutPageConfig);
          break;
        case 'register-success':
          registerSuccessPageConfig.extras = new Map<String, dynamic>();
          registerSuccessPageConfig.extras['account_id'] = uri.queryParameters['account_id'];
          _pages.add(MaterialPage(
              child: RegisterSuccessPage(),
              key: ValueKey(registerSuccessPageConfig.key),
              name: registerSuccessPageConfig.path,
              arguments: registerSuccessPageConfig));
          break;
      }
    }
  }
}
Finally, update the file lib/app-state.dart by adding the code as follows:
...
class AppState extends ChangeNotifier {
  ...
  void goToRegister() {
    _currentAction = PageAction(state: PageState.addPage, page: registerPageConfig);
    notifyListeners();
  }

  void goToRegisterSuccess() {
    _currentAction = PageAction(state: PageState.addPage, page: registerSuccessPageConfig);
    notifyListeners();
  }
  ...
}
Now that we have set up the routing for the Register Success deep link, let's test it out in the next section.
Testing the Register Success page deep link
To test the deep link to the Register Success page, use the terminal to run the following command:
adb shell am start -W -a android.intent.action.VIEW -c android.intent.category.BROWSABLE -d "pandagums://deeplinks/register-success?account_id=test_deeplink1234"
Once you run the above command, you should see the deep link working as shown in
Figure 2.2. You'll also notice that the accountId in the
Customer page also gets updated with the ID we've provided in the deep link
test. I.e. test_deeplink_1234

You can play around by providing different account IDs via the adb shell command, and it will always reflect the latest provided id in the Customer view. In fact, we'll use our already created account's ID next time using the command when we have to pay for products.
Also, if you want, you can follow a full seller onboarding flow now. You should be able to see the deep link working. And the newly created account's ID appearing in the customer page in the end.
Paying for the Seller products as a Customer
To pay for the customer, the app requires a valid accountId to be set in the
App State. In order to work with an existing Seller account, go to your Stripe
Dashboard. Navigate to Connected Accounts. Make sure that you have Test Mode
enabled. And then copy an existing Account ID as shown in
Figure 2.3

Notice that in Figure 2.3, we have SEK 0.00 as the Total balance for this seller. This is because no one has bought any products from this seller. By the end of this tutorial, this seller should have some money in the bag. 💰
Making sure that the app is running, open your terminal and type the following
adb shell command replacing YOUR_ACCOUNT_ID with the account ID you copied:
adb shell am start -W -a android.intent.action.VIEW -c android.intent.category.BROWSABLE -d "pandagums://deeplinks/register-success?account_id=YOUR_ACCOUNT_ID"
Note: You might have to run this command again if you close the emulator, or even if you do a Hot Restart of the app. Because the value of
accountIdis lost in that case from the App State.
Now that we have the accountId set in the App State, we can do something about
paying for the products as a customer.
How to pay for a product? Really!
In order to pay for a particular product, we will use Checkout, a Stripe-hosted page to accept payments for one-time purchases and subscriptions. Figure 2.4 shows how the entire Payment flow looks like

Essentially, these are the steps of the flow:
- From the Flutter app, we trigger the API call
GET http://localhost:3000/api/stripe/checkout-session - The backend uses the Stripe Node.js SDK to call the Create Stripe Checkout Sessions API. As a response, we get back a checkout session object.
- The backend sends the checkout session object back to the Flutter app.
- The Flutter app opens the Checkout page
(CheckoutPage)which just a Flutter page (aMaterialPageRoute) within the app. We pass the session ID as an argument to the page's constructor so it can use it later on. - In the Checkout Page, we use the
WebViewwidget from the webview_flutter package to open a webview with a pre-defined HTML page containing the Stripe Web (Javascript) SDK. - We invoke the the Stripe Web SDK's
redirectToCheckout()within the WebView programmatically by passing the Session ID. This triggers a redirect in the WebView to the Stripe-hosted checkout page where the Customer can pay for the product(s). - Once the payment is finished, Stripe redirects the Customer to either the
success_urlor thecancel_urlthat we configure in the backend while creating the Checkout Session. - Based on the redirect in Step 7, the WebView is closed automatically and we show a toast message within the Flutter app based on the result.
Installing the webview_flutter package
Since our flow requires open a WebView as shown in Figure 2.4, we need to install the webview_flutter package. From the project root, run the following command in your terminal to do so:
flutter pub add webview_flutter
Note: After the above change, the app needs a full restart. Restart the app before proceeding with further steps.
Understanding the Backend API to create a session
To understand how we create a session using the Stripe Node.js SDK, have a look at the following code:
const stripe = require('stripe')(process.env.STRIPE_API_SECRET)
const host = process.env.NEXT_PUBLIC_HOST
const appFee = process.env.STRIPE_APP_FEE

/**
 * Generates a checkout session based on the Connected Account Id and other
 * data provided. Handles cases for both the flutter app and the web.
 */
const checkoutSession = async (req, res) => {
  const { account_id: accountId, amount, title, currency = 'eur', quantity, mobile } = req.query
  const session = await stripe.checkout.sessions.create({
    payment_method_types: ['card'],
    line_items: [
      {
        name: title,
        /**
         * Multiplying by 100 because otherwise for example,
         * 149 becomes 1.49 on Stripe
         */
        amount: Math.round(amount) * 100,
        currency,
        quantity,
      },
    ],
    payment_intent_data: {
      /**
       * Multiplying by 100 because otherwise for example,
       * 149 becomes 1.49 on Stripe
       */
      application_fee_amount: appFee * 100,
      transfer_data: {
        destination: accountId,
      },
    },
    mode: 'payment',
    success_url: `${host}/pay-out${mobile ? '-mobile' : ''}?result=success`,
    cancel_url: `${host}/pay-out${mobile ? '-mobile' : ''}?result=failure`,
  })
  res.status(200).json({ session })
}

export default checkoutSession
A few things to note here. First, the API expects to receive the parameters
account_id, amount, title, currency, quantity, and mobile. Although
the parameters currency and mobile are optional, for this tutorial, they are
still going to be provided from the Flutter app.
Notice that we use the stripe.checkout.sessions.create() method to create a
session. And we pass all the required arguments in the method. The
payment_method_types is set to ['card'] so the Customer lands on a page that
supports card payments. Theline_itemsproperty is an array that contains
details for each product the customer is paying for. And in
thepayment_intent_dataobject, we provide theapplication_fee_amount, which is
the commission the marketplace will get on this transaction, and
thetransfer_dataobject which specifies the seller's account ID as
thedestination. This tells Stripe where to transfer the amount from this
payment.
And finally, we provide the success_url and the cancel_url to which Stripe
redirects the Customer when the Payment is finished, or cancelled respectively.
Notice that similar to the Seller onboarding, these URLs are web pages in our
local backend. And for the Flutter app, they result in being
http://localhost:3000/payout-mobile?result=RESULT
Now that we know about the backend part, let's start writing some code in the Flutter app as well.
Updating the StripeBackendService to create Checkout Sessions
Open the file lib/services/stripe-backend-service.dart and update it as
follows:
import 'dart:convert';
import 'package:flutter_stripe_connect/pages/pay-out.dart';
...
class StripeBackendService {
static String apiBase = '$BACKEND_HOST/api/stripe';
static String createAccountUrl =
'${StripeBackendService.apiBase}/account?mobile=true';
static String checkoutSessionUrl =
'${StripeBackendService.apiBase}/checkout-session?mobile=true';
static Map<String, String> headers = {'Content-Type': 'application/json'};
...
static Future<CheckoutSessionResponse> payForProduct(
Product product, String accountId) async {
var url = StripeBackendService.checkoutSessionUrl +
"&account_id=$accountId&amount=${product.price}&title=${product.title}&quantity=1¤cy=${product.currency}";
Uri parsedUrl = Uri.parse(url);
var response =
await http.get(parsedUrl, headers: StripeBackendService.headers);
Map<String, dynamic> body = jsonDecode(response.body);
return new CheckoutSessionResponse(body['session']);
}
}
Creating the CheckoutPage material route
Now we'll create a new page called the CheckoutPage. Create a new file under
the lib/pages folder named checkout.dart and add the following code:
import 'dart:convert';
import 'package:flutter/material.dart';
import 'package:webview_flutter/webview_flutter.dart';
import '../constants.dart';

String checkoutSuccessUrl = '$BACKEND_HOST/pay-out-mobile?result=success';
String checkoutFailureUrl = '$BACKEND_HOST/pay-out-mobile?result=failure';
String stripePublicKey = 'pk_test_EYFzViclTJlQjgVjGSA4ND7k00wUh0e1tK';

const stripeHtmlPageScaffold = '''
  <!DOCTYPE html>
  <html>
    <script src="https://js.stripe.com/v3/"></script>
    <style>
      body, html {
        width: 100%;
        height: 100%;
        margin: 0;
        padding: 0;
      }
      #loader {
        width: 100%;
        height: 100%;
        display: flex;
        justify-content: center;
        align-items: center;
      }
    </style>
    <head><title>Stripe checkout</title></head>
    <body>
      <div id="loader">
        <span>Please wait...</span>
      </div>
    </body>
  </html>
''';

class CheckoutPage extends StatefulWidget {
  final String sessionId;

  const CheckoutPage({Key? key, required this.sessionId}) : super(key: key);

  @override
  _CheckoutPageState createState() => _CheckoutPageState();
}

class _CheckoutPageState extends State<CheckoutPage> {
  late WebViewController _controller;

  @override
  Widget build(BuildContext context) {
    return Scaffold(
      resizeToAvoidBottomInset: false,
      body: Container(
        padding: EdgeInsets.only(top: 30),
        child: WebView(
          initialUrl: initialUrl,
          javascriptMode: JavascriptMode.unrestricted,
          onWebViewCreated: (controller) => _controller = controller,
          onPageFinished: (String url) {
            if (url == initialUrl) {
              _redirectToStripe();
            }
          },
          navigationDelegate: (NavigationRequest request) {
            if (request.url.startsWith(checkoutSuccessUrl)) {
              Navigator.of(context).pop('success'); // <-- Handle success case
            } else if (request.url.startsWith(checkoutFailureUrl)) {
              Navigator.of(context).pop('cancel'); // <-- Handle cancel case
            }
            return NavigationDecision.navigate;
          },
        ),
      ),
    );
  }

  String get initialUrl => 'data:text/html;base64,${base64Encode(Utf8Encoder().convert(stripeHtmlPageScaffold))}';

  void _redirectToStripe() {
    final redirectToCheckoutJs = '''
      var stripe = Stripe(\'$stripePublicKey\');
      stripe.redirectToCheckout({
        sessionId: '${widget.sessionId}'
      }).then(function (result) {
        result.error.message = 'Error'
      });
    ''';
    _controller.evaluateJavascript(redirectToCheckoutJs); //<--- call the JS function on controller
  }
}
We're doing two important things in the above code snippet, specifically in the
WebView widget:
- When the page finishes loading, notice that in the
onPageFinishedcallback, we check if theurlis similar to theinitialUrl. Which means we've loaded our hard-coded HTML page from the variablestripeHtmlPageScaffold. In this case, we run the_redirectToStripe()method. Which results in redirecting the Customer to the Stripe-hosted Checkout page. Essentially, we're executing the Javascript from theredirectToCheckoutJsvariable. - Inside the
navigationDelegatemethod, we monitor each navigation using theNavigationRequestargument. We check theurlof the NavigationRequest and if contains thecheckoutSuccessUrlor thecheckoutFailureUrl. Based on these conditions, we go back to the previous page usingNavigation.of(context).pop(). And we pass eithersuccessorcancelas a parameter back to the previous (PayOut) page based on the url matched.
Update the PayOut page to use the CheckoutPage
Now that we have the CheckoutPage created, let's use it in the PayOut page
when the Customer tries to pay for a product. Open the file
lib/pages/pay-out.dart and update as follows:
import 'dart:developer';
import 'package:flutter/material.dart';
import 'package:flutter_stripe_connect/pages/checkout.dart';
import 'package:flutter_stripe_connect/services/stripe-backend-service.dart';
import 'package:provider/provider.dart';
import 'package:sn_progress_dialog/progress_dialog.dart';
import '../app-state.dart';
...
  List<InkWell> _buildCard(int count) => List.generate(count, (i) {
    final appState = Provider.of<AppState>(context, listen: false);
    String accountId = appState.accountId;
    return InkWell(
      child: Card(
        child: Column(
          mainAxisAlignment: MainAxisAlignment.center,
          crossAxisAlignment: CrossAxisAlignment.center,
          children: [
            ...
            ButtonBar(
              children: <Widget>[
                ElevatedButton(
                  style: ButtonStyle(backgroundColor: MaterialStateProperty.all(
                    Theme.of(context).accentColor
                  )),
                  child: const Text('Pay with Stripe'),
                  onPressed: () async {
                    ProgressDialog pd = ProgressDialog(context: context);
                    pd.show(
                      max: 100,
                      msg: 'Please wait...',
                      progressBgColor: Colors.transparent,
                    );
                    try {
                      CheckoutSessionResponse response = await StripeBackendService.payForProduct(products[i], accountId);
                      pd.close();
                      String sessionId = response.session['id'];
                      Future.delayed(Duration(milliseconds: 300), () {
                        Navigator.of(context).push(MaterialPageRoute(
                          builder: (_) => CheckoutPage(sessionId: sessionId),
                        ))
                            .then((value) {
                          if (value == 'success') {
                            ScaffoldMessenger.of(context).showSnackBar(
                                new SnackBar(
                                  content: Text('Payment Successful'),
                                  backgroundColor: Colors.green,
                                )
                            );
                          } else if (value == 'cancel') {
                            ScaffoldMessenger.of(context).showSnackBar(
                                new SnackBar(
                                  content: Text('Payment Failed or Cancelled'),
                                  backgroundColor: Colors.red
                                )
                            );
                          }
                        });
                      });
                    } catch (e) {
                      log(e.toString());
                      pd.close();
                    }
                  },
                ),
              ],
            )
          ],
        )));
  });

  @override
  Widget build(BuildContext context) {...}
}
Notice that in the highlighted code snippet above, we're doing the following:
- When we tap the Pay with Stripe button, we first use the
StripeBackendService.payForProduct()method by passing the current product, i.eproduct[i]and theaccountIdwhich is the Seller's Account ID. - Then we extract out the
idfrom theCheckoutSessionResponsereceived and assign it to thesessionIdvariable. - Then we use a
Future.delayed()just to wait for the progress dialog to hide. Otherwise it causes some UI issues. - Inside the
Future.delayed()callback, we create a newMaterialPageRouteusing theCheckoutPagewidget. - We use the
.then()chainable method to listen for theCheckoutPageto be closed or popped. And we receive eithersuccessorcancelas a parameter as explained in the details section for theCheckoutPage. - Based on the parameter received, we show either the success SnackBar, or the failure SnackBar.
Testing payments as a Customer
First, make sure you have the app in a fresh state. I.e. either do a full
restart, or a hot-restart. Then set the seller account ID in the app by running
the following command replacing ACCOUNT_ID with an account ID from your stripe
dashboard:
adb shell am start -W -a android.intent.action.VIEW -c android.intent.category.BROWSABLE -d "pandagums://deeplinks/register-success?account_id=ACCOUNT_ID"
This should bring up the Register Success Deep link page in the app. Press the back button and then verify the account ID by going to the Pay as a Customer page. You should be able to see it as shown in Figure 2.2, but with your Seller's account ID.
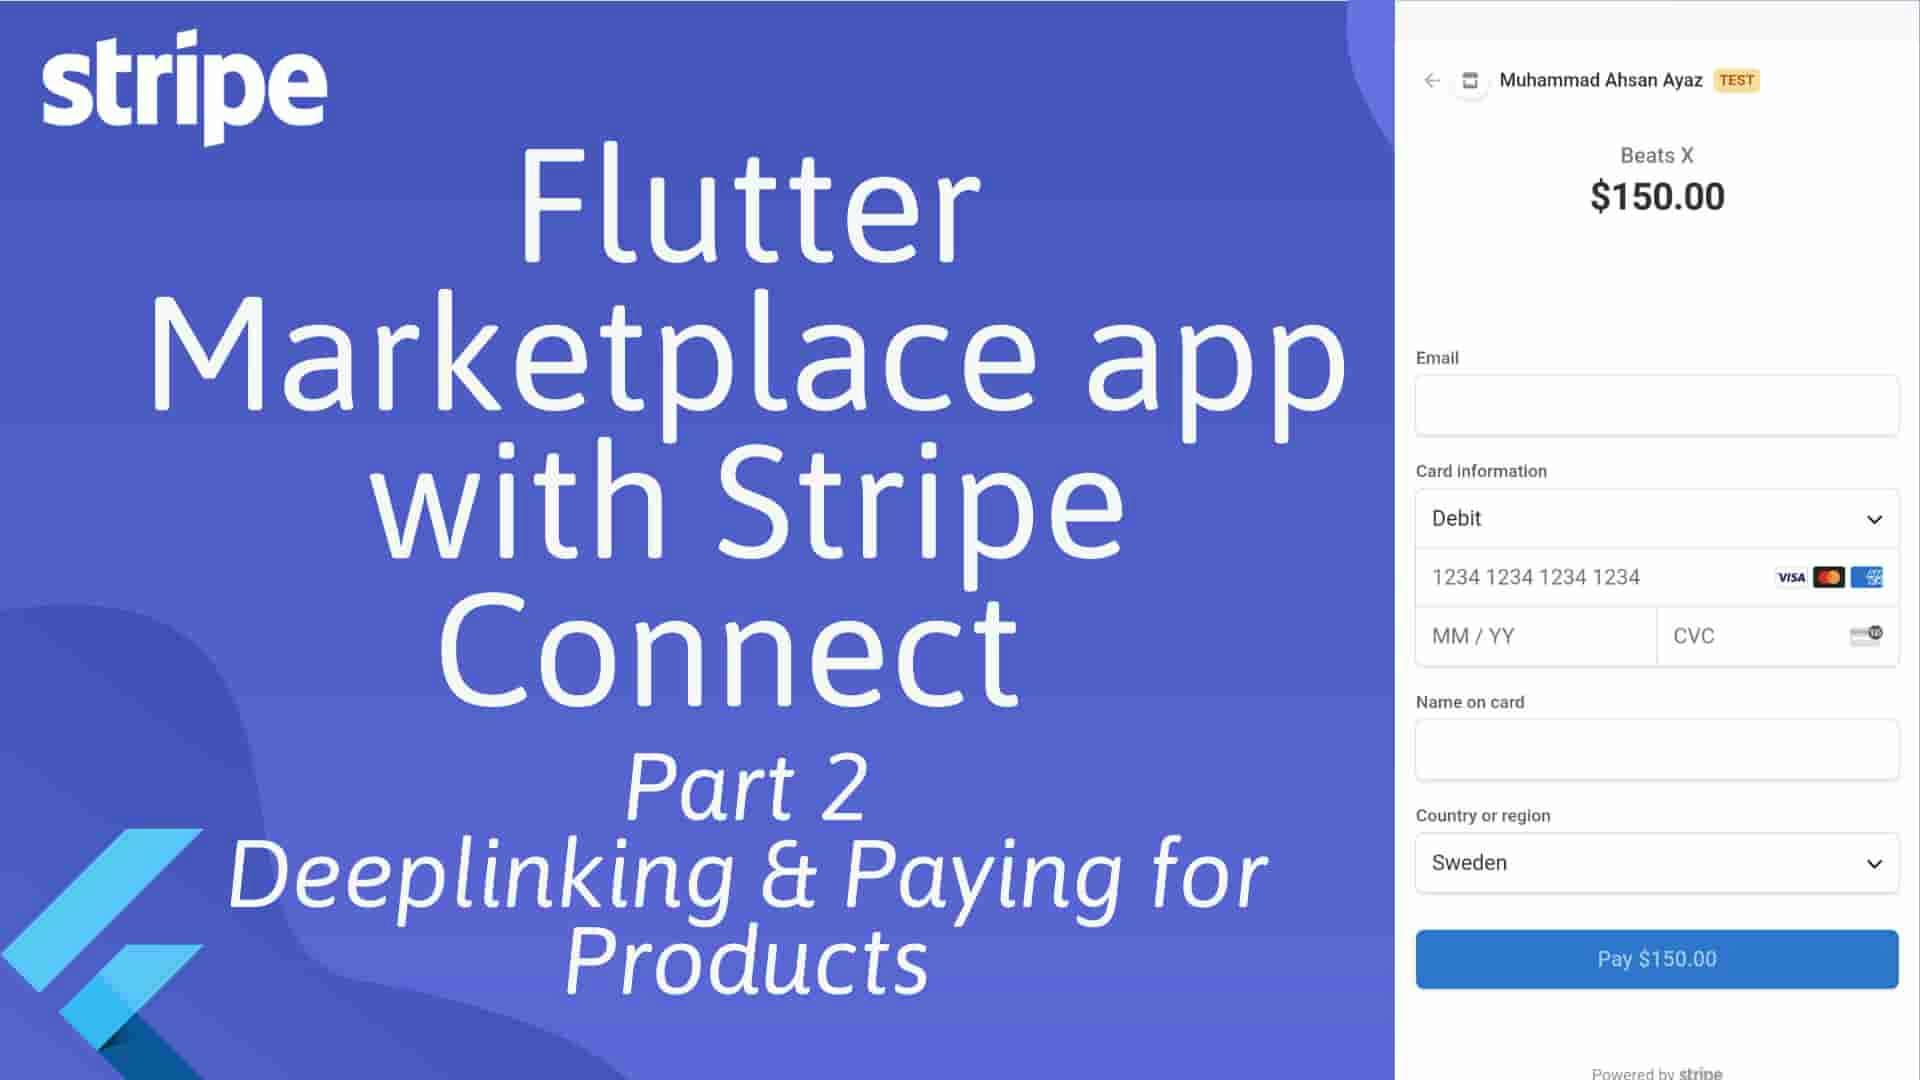
Now press the Pay with Stripe button on any of the products. And you should see the Stripe Checkout page as shown in Figure 2.5

Now let's see what happens if the user cancels the payment. Figure 2.6 shows that when the user cancels the payment, the WebView is automatically closed and we see the toast message of cancellation.

Awesome!😄 Now let's talk about a successful payment. Note that our Seller doesn't have any earnings so far as shown in Figure 2.3. With a successful payment, that should change eventually. Figure 2.7 shows what happens in a successful payment flow. Notice that you have to also use a test card for testing the payment.
Note: Stripe recommends using
4242-4242-4242-4242as the card, any future date, and any 3 digit CVC for test payments. Similarly what we've used in Figure 2.7

Woohoo 🎉! Our first successfuly payment for this Seller. If you go to your Stripe Dashboard and have a look at the Seller account, you should see the balance increased as shown in Figure 2.8.

Conclusion
Phew! I know this was a looong tutorial. But trust me, it took me more time to
plan and write it than what it took for you to follow 😄. And I hope you enjoyed
it as much as I enjoyed making it. In this tutorial we learnt how to implement
deep links with Flutter's Navigation 2.0. We also learnt how to use a WebView
using the webview_flutter package along with the Stripe Web (Javascript) SDK
to implement the Checkout flow. There are a lot of other hidden gems in the code
that you can explore yourself and might be covered in the Video Tutorial as
well. Don't forget to share this article within your circle so more people can
learn how to work with Flutter and Stripe Connect. And as always, stay safe,
stay healthy, and Happy Coding! 🎉